
Weather station
The weather station consists of a white radiation protective housing which houses the sensor for measuring temperature, atmospheric pressure and humidity. The other sensors are connected externally by cable.
Sensor recovery
If the sensor comes directly from the factory, the sensor must be revived by inserting a battery and waiting for the first message, which is sent by the device every 30 minutes on the Sigfox network or every 60 minutes on the NarowBand-IoT network.
Unscrew the bottom of the radiation cover (bayonet thread) and remove the internal capsule. Pull apart the cover cap pressed into the capsule body (it houses the humidity sensor and interconnecting cable) and remove the base plate from the housing. Handle the base plate with extreme care, as it is sensitive to mechanical and electrostatic damage.
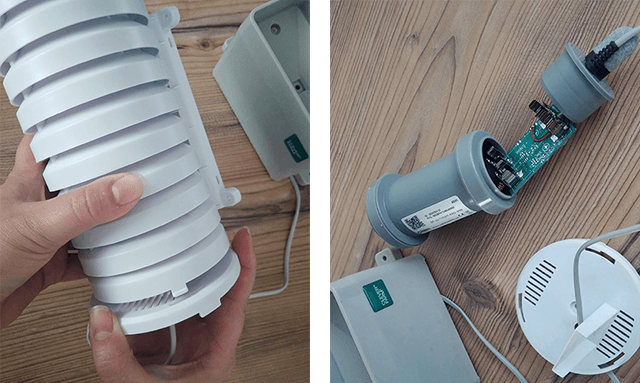
Fig. 1: Disassembly of the weather station cover
Insert a 3.6V AA pencil battery into one of the prepared slots, the polarity is marked on the motherboard. After inserting the battery, the sensor will be "animated" by flashing the green LED on the dashboard. If the indication does not occur, remove the battery and reinsert it into the device (select a different battery slot). Increase the life of the device by inserting batteries in both slots.
Note: When using two batteries, care should be taken to ensure that they have the same voltage.
Otherwise, the weaker battery will be recharged by the stronger one and will degrade. We recommend always inserting new batteries!
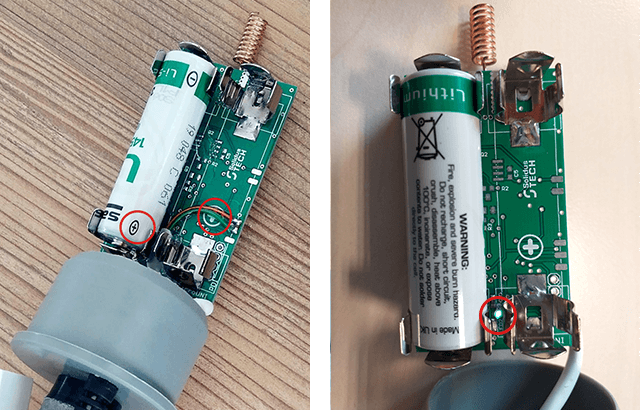
Fig. 2: Battery slots and status LED
Close the capsule tightly (IP65) and put it back into the radiation cover. Screw the bottom back onto the radiation cover. The sensor is then ready to be mounted on the bracket.
If the sensor stops transmitting messages, you can restart the device in the above manner by removing and reinserting the battery after approximately 10 seconds.
Installing the sensor
We recommend placing the weather station about 1,6 to 2 meters above the ground. Use the levelling bubble to adjust the rain gauge to a horizontal position. For the wetting sheet to work properly, it is important that it is inclined slightly from the horizontal by between 10 and 25 degrees. The direction of the meanders, which must lie across the slope, is also crucial. As far as measuring the wind direction is concerned, there is a depression marked with an N on the fixed part of the weathervane connected to the stick - this must always point north.

Fig. 3: Incorrect installation of the humidity sensor - the meanders must lie across the slope!
If you are using a weather station or soil sensor to predict pests and diseases, please contact our sales team for detailed information.
As a supplement to these instructions, you can watch a simplified video tutorial.
Note: The device is functional at temperatures from -20° C to 60° C. Frost will not damage the device, however, exposure to adverse climatic conditions will shorten the functional life of the sensors. It is recommended to store the weather station indoors during winter, remove the batteries and extend the life of the device.
Sensor activation
The final step is to activate the soil sensor in the CleverFarm app, which is described in detail in the Sensors article.
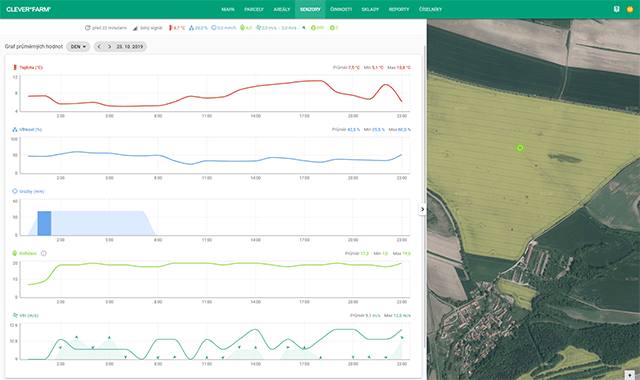
Fig. 4: Weather station in CleverFarm
Sensor maintenance
Like any device that can withstand adverse weather conditions, the weather station requires basic maintenance. In particular, pay attention to the precipitation collection tray, including the contained mechanics, which must be kept clean for proper operation of the rain gauge.
In year-round operation, air humidity measurements may be distorted due to prolonged exposure of the equipment to freezing temperatures (typically settling at 100% air humidity. Correction is possible by a so-called regeneration process, where the humidity sensor is completely dried and rehydrated. We recommend taking the device indoors and drying it for three days at temperatures up to 50 °C.